
Last Updated on December 27, 2023 by Neil Murray
All Add-ons functions are available in addons.js and can be accessed at window.cf7svisual.addons.functionName().
Basically we follow the same approach as Gutenberg, using the WordPress apply_filters and add_filter functions.
Refer:
- How Gutenberg allows others to Register GutenBlocks
- How Gutenberg uses AJAX for WP REST API requests
Add-on Hooks #
- edit added in
Form/Edit/index.js.
Passed parameters:
– propsobjectEdit props.
– stylesobjectavailable styles found inindex.css. - beforeToolbar added in
Form/Items/InputItem/index.js.
Passed parameters:
– nodeobjectcurrent edited node.
– stylesobjectavailable styles found inindex.css. - itemToolbar added in
Form/index.js.
Passed parameters:
– propsobjectall Form component props - menu added in
Form/Items/InputItemMenu/index.js. Learn more about creating an Add-ons Menu.
More Add-on hooks might be added in the future as needed. Be sure to use the appropriate hook to display Add-on components.
Refer
src/visual/util/cf7sItems.jsfor default node properties.
Add-on Functions #
All Add-on functions are available in addons.js:
- register( hook, callback )
– hookstringthe hook name to register
– callbackfunction/objectcallback function/object for rendering -supports JSX - get( hook )
– hookstringthe hook name to get
Registering Add-ons #
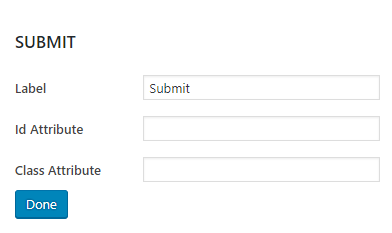
In this example, we add a component to the Edit dialog using the edit hook.
First we need to create our MyEditAddon component that contains the render function in JSX as below:
const MyEditAddon = (node, editOnChange , styles) => {
  const myValue = !! node.cf7sMyAddon ? node.cf7sMyAddon : ''

  return (
    <div className={styles.attribute} key="cf7sMyAddon">
      <div className={styles.label}>My Addon</div>
      <div className={styles.value}>
        <input type="text" name="cf7sMyAddon" value={myValue}
          onChange={editOnChange} />
      </div>
    </div>
  )
}
There are three passed parameter ( node, editOnChange , styles ) which can be used.
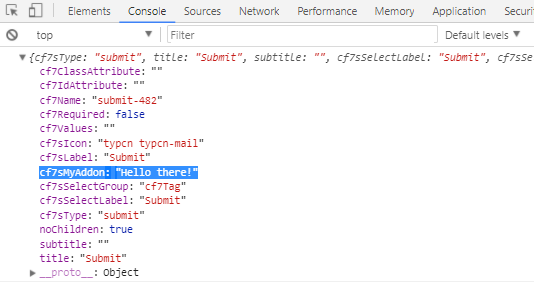
#We name our input as cf7sMyAddon which does not exist in the node property yet. Once we edit it, it will be available in the node object.
The editOnChange call back function will handle the changes to the input and update the node object.
Since we store our input type="text" as a single string, we don’t need to pass any arguments to it.
To store the input value as an array, we would need to pass:
onChange={ event => {
  onChange( event, 'myArrayName', event.target.value )
}}
Read more about editOnChange function for input type handling.
Unique Key #
We need to provide key="cf7sMyAddon"
<div className={styles.attribute} key="cf7sMyAddon">
because the Edit React Component iterates it and should have a unique ‘key’ prop.
const renderAddonEdits = get('edit').map((edit) => {
    return edit(node, this.props.editOnChange, styles)
})

See https://fb.me/react-warning-keys for more information.
Register the render function #
Finally we register the render function into the edit hook:
window.cf7svisual.addons.register( 'edit', MyEditAddon )
Now the Add-on component is ready to render in the Edit dialog.
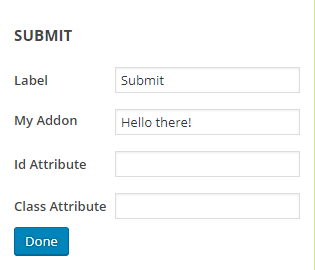
After changes, the RST node will have the cf7sMyAddon property.
Enqueueing Add-ons File #
Addons should enqueue their files using wp_enqueue_script to CF7 admin page. It should be loaded right after the addons.js file, before main visual .js file or the addons will not be applied into Visual. For example,
add_action( 'admin_enqueue_scripts', 'my_enqueue_script', 10 );

function my_enqueue_script() {
  // Return if this is not CF7 editing page
  if ( ! CF7_Skins_Admin::edit_page() ) {
    return;
  }

  wp_enqueue_script( 'my-addon.js',
    $my_plugin_url . 'my-addon.js',
    array( 'visual-addons' ), $my_version, true );
}
As the result, the addon file will be enqueued in between as seen below.
<script type='text/javascript' src='...init.js'></script>
<script type='text/javascript' src='...addons.js'></script>
<script type='text/javascript' src='...my-addon.js'></script>
<script type='text/javascript' src='...visual.js'></script>
Separating Add-on Files #
- wp.org requires that a plugin does not include any disabled code
- we have to ensure that no Add-on code is included in the free version of CF7 Skins
- we can however provide a connection mechanism for CF7 Skins Visual Addons in the free version of CF7 Skins
Code Splitting #
We use webpack code splitting to ensure:
- no Add-on code is included in the free version of CF7 Skins
- all the JS code for each Add-on is created as a chunk which can be added as a standalone file in the Add-on plugin
- Add-on JS is loaded dynamically as needed
Add-on Folders #
Each Add-on:
- needs to export as module
- folder needs to contain all the code for that Add-on
- needs their own webpack chunk file
All the JS code for the Add-on is created as a webpack chunk which can be added as a standalone file in the Add-on plugin.
Further Reading
- Visual Menu for Add-Ons
- How Gutenberg allows others to Register GutenBlocks
- How Gutenberg uses AJAX for WP REST API requests
- Display JS functionality for Add-ons (BitBucket Issue)
- Use register() and get() for Add-ons (BitBucket Issue)
- Share JS data between lite.js & pro.js so Lite & Pro plugins work simultaneously (BitBucket Issue)
Notes
Add comments, questions & notes here.
Save all Images to Sync – use ..\ Sync\..\Development\Development Guidelines\CF7 Skins Code\CF7 Skins Visual Code\Working with CF7 Skins Add-ons\